DIY Flatfield Dustcover with RPi
- Markus Schaefer
-

- Offline
- New Member
-

- Posts: 3
- Thank you received: 0
Replied by Markus Schaefer on topic DIY Flatfield Dustcover with RPi
when i try to connect the ServoBlaster Cap in the INDI Control Panel I get the following error-message:
[ERROR] ServoBlaster Cap is offline, did not initialize. Service servod not running
Anyone have a idea what can I do?
Best regards
Markus
Sorry for my bad english
Please Log in or Create an account to join the conversation.
INDI Library v2.0.7 is Released (01 Apr 2024)
Bi-monthly release with minor bug fixes and improvements

Replied by pauledd on topic DIY Flatfield Dustcover with RPi
Rendering Error in layout Message/Item: array_keys(): Argument #1 ($array) must be of type array, null given. Please enable debug mode for more information.
Please Log in or Create an account to join the conversation.
Replied by pauledd on topic DIY Flatfield Dustcover with RPi
Well,now that I received my first 3d printer from far east I can give a short update of my (never-ending) dustcover project.
I decided to print some of the stability related parts in PLA with my new printer because some parts started to fall of from
that wooden-glued construction under that "harsh" outside conditions...
So I dived a little bit into freecad and things seemed to come out perfectly fitting.


But once everything was connected I noticed that there is something wrong.
pls excuse my bad english!
")
Please Log in or Create an account to join the conversation.
Replied by pauledd on topic DIY Flatfield Dustcover with RPi
If I unpark the cap it opens only as much as it does not cover the field of view.
The servo already runs from min to max (90ms/210ms) and of cause I set both open/close to 100% in the calibration tab.
Even with that "on the edge" settings it is not able to fully close. Unfortunately I am not a mechanics genius and I
currently don't really know where to start to optimize...
Maybe I should make that angle longer that holds the flatfield.

There are currently more questions that answers swirling through my mind

The second issue is that either wrong storage or glueing the angle to the flatfield bent
the whole flatfield acrylic plate a bit outside so that it cannot really close anymore, that's not acceptable
for stationary outside conditions. I think I will either glue a new acrylic plate only on some points or I will
exchange the whole thing by aluminium (0,5 or 1 mm).


If someone has and instant idea what I should change to make that dustcap easily open/close feel free to divulge

EDIT: I will give freecad's animation simulation a try, maybe I can figure out how to get it work proper.
pls excuse my bad english!
Please Log in or Create an account to join the conversation.
- Markus Schaefer
-
- Offline
- New Member
-
- Posts: 3
- Thank you received: 0
Replied by Markus Schaefer on topic DIY Flatfield Dustcover with RPi
the servod isn't running. How can I do this? There nothing stand in the tutorial.
Markus
Please Log in or Create an account to join the conversation.

Replied by Magnus on topic DIY Flatfield Dustcover with RPi
Rendering Error in layout Message/Item: array_keys(): Argument #1 ($array) must be of type array, null given. Please enable debug mode for more information.
Please Log in or Create an account to join the conversation.
Replied by pauledd on topic DIY Flatfield Dustcover with RPi
If you meant the hole in the linkage...
I used the outer hole before I made the video. The Problem with that was the amount of way I earned with that to the "close" position
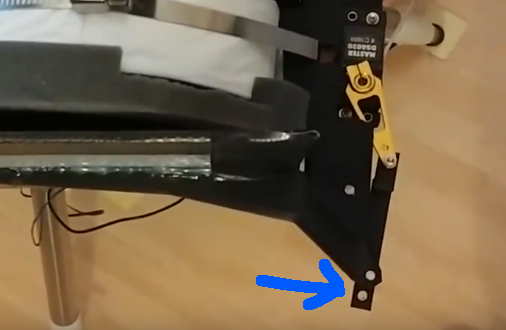
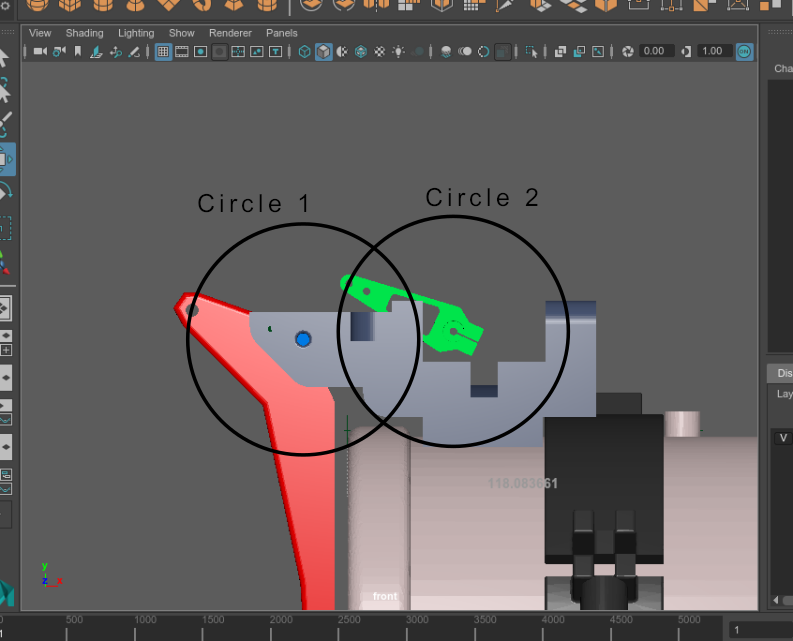
was then missing in the open position, it was even less that 90° so that the tubes fov was a bit blocked...Good point, I lose 30° somewhere from the servos 120°.Ok, can you please use the annotations in this image? I dont get it

What mount point closer to which pivit point? Do you mean I should decrease circle1?
pls excuse my bad english!
Please Log in or Create an account to join the conversation.
Replied by Magnus on topic DIY Flatfield Dustcover with RPi
Website: Observatory 17b
Build thread @ SGL: Starting summers observatory project
Please Log in or Create an account to join the conversation.
Replied by pauledd on topic DIY Flatfield Dustcover with RPi
 where are the 30° gone? I designed circle1 with the exact diameter as circle2, that shouldn't that give the same angle range as the servo does... in theory I'll investigate further!
 pls excuse my bad english!
Please Log in or Create an account to join the conversation.
Replied by Magnus on topic DIY Flatfield Dustcover with RPi
The pivot point is not at the point where the angle for the lid arm is. Looks to be half a cm or so offset up to the hole for the link.
Thats the great thing with 3d printing. If first prototype is off, then try again
Website: Observatory 17b
Build thread @ SGL: Starting summers observatory project
Please Log in or Create an account to join the conversation.
Replied by pauledd on topic DIY Flatfield Dustcover with RPi
I reduced circle 1 radius to be only 80% of the circle 2 radius. I even had to reduce the servos travel distance in the calibration tab.
I had another problem where the cover. It wont open in the most extreme position (most force needed) but I could solve that by moving the rod that holds the close magnet just a little tiny bit away from the dustcap, that reduced the force of the magnets.
The last problem seemed to be solved too. It locked as if the dustcap would not close planar anymore to the foam gasket.
But the cap was not bending as I first thought. The problem was the hole mechanics was to tight/stiff. The axis of the hinge on which the cap is attached needs to have a certain backlash so that the cover can lay/adapt planar on the foams surface.
I will now do some more dry tests before I heft my scope back into the wilderness
pls excuse my bad english!
Please Log in or Create an account to join the conversation.

Replied by Axel on topic DIY Flatfield Dustcover with RPi
thank you for sharing your experience so far and it nice to see everything is working for you. I got some really interesting ideas for my own FlipFlat project. A long time passed. When I read through the thread carefully, I see you made some changes to the code and did a CAD design different to the one of. So would you mind share the final project summary with us?: source code, stl/obj/freecad files, specs.
best regards
Axel
Please Log in or Create an account to join the conversation.